The Complete WordPress Optimisation Guide [Ultimate Handbook]
I’ve put a decade of first-hand experience into The Complete WordPress Optimisation guide. It really is the only resource you will ever need in your bookmarks for optimising any WordPress website.![The Complete WordPress Optimisation Guide [Ultimate Handbook]](https://whisperlouder.com/wp-content/uploads/2021/04/wordpress-optimisation-guide-1-900x503.jpg)
So you need a WordPress Optimisation Guide and you’re wondering how to optimise a WordPress website? Well, You have come to the right place.
WordPress is easily one of the platforms I have worked with the most during my day job as a full-stack web developer and writing blog articles. It’s also a robust platform out of the box, providing a rich feature set for bloggers but, it needs a little TLC when it comes to speed and correct optimisation for SEO.
The On-Site SEO Optimisation steps shouldn’t be skipped but, if you are short on time you could follow my guide that teaches you how to install WordPress on a server and optimise it in a fraction of the time compared to following this guide.
I’ve put a huge amount of time into writing all of this WordPress setup guide up and I would really appreciate a share or a mention.
Why Should I Optimise WordPress?
You might be tempted to leave optimising your WordPress website altogether It will likely run just fine with one or two people visiting a day but, the moment it starts getting more traffic, and you have to deal with concurrent connections (more than one person connecting at a time), you will start to face bottlenecks and a slow website.
According to Google, The probability of bounce increases 32% as page load time goes from 1 second to 3 seconds.
A slow website means a bad user-experience which is terrible for your profits. When you’re starting your own blog, It can feel overwhelming with the seemingly endless list of things you need to do to be competitive but, I can assure you that everything in this WP optimisation guide will cover the bases and give you a solid basis to build from.
So, without further ado and enough procrastination, let’s explore the world of WordPress optimisation in full technicolour detail.
WordPress Optimisation Guide
Below you will find the only WordPress how-to guide you will ever need. The complete guide to optimising a fresh WordPress installation from the ground up.
Google Page Experience Introduction
| What is Cumulative Layout Shift (CLS) |
| What is First Input Delay (FID) |
| What is Largest Contentful Paint (LCP) |
Basics Setup
| 1. Change WordPress Permalinks |
| 2. Disable trackbacks and pingbacks |
| 3. Change Website Meta Title & Meta Description |
| 4. Clean WP Head Output |
SEO Optimisation
| 1. Install Yoast SEO |
| 2. Schema.org Business Information Setup |
| 3. Social Media Integration |
| 4. Yoast Breadcrumb integration |
| 5. Setup Search Appearance |
Speed Optimisation
Google Page Experience Introduction
Google Page Experience is a vital SEO ranking signal, didn’t you know? I spoke about website user experience in an earlier article if you want to head over and take a quick look.
If you’re stuck on time, allow me to summarise.
On May 28 2020, Google announced they would start to measure a users page experience when determining how to rank a website in search results.
This announcement culminated in three key metrics being given more weight when deciding where to position a website in SERPs;
Google Page Experience Metrics
- CLS – Cumulative Layout Shift
- FID – First Input Delay
- LCP – Largest contentful paint
Below you will find the most common causes of a bad page speed insights report and common fixes to solve the issues and potentially increase your websites engagement rate.
What is Cumulative Layout Shift (CLS)
Cumulative Layout Shift, or CLS for short, measures the stability of a website when it first loads. In lamen terms, how much does your page shift about when it first loads? A good example of a bad website CLS is when a web page first loads; You think it’s complete so, you go to click a link and the webpage ‘shifts’, causing you to hit the wrong thing – it’s annoying.
Having a poor CLS indicates to Google search robots that your website provides a poor user experience so, what causes it?
Causes of Poor Cumulative Layout Shift (CLS)
- Your images, embed or iframes do not provide explicit heights or widths
- Adverts load asynchronously in most cases and can cause CLS
- Poor image lazy loading execution
- Incorrectly configured webfonts that produce Flash of unstyled text (FOUT)
How to fix bad Cumulative Layout Shift on WordPress
- Set explicit dimensions for all images, iframes and embeds on the page
- Set heights for advert blocks
- Make sure to use a lazy loading placeholder
- Use
font-display:swap;for webfonts and make sure to set a default system font as well.
What is First Input Delay (FID)
First input delay, or FID for short, calculates how long it takes for actions to be completed on your website. For example, if a user clicks a link on your website, how long does it take for the browser to respond? It’s a good measure of how responsive your website is and the type of user experience it provides to visitors.
Causes of Poor First Input Delay (FID)
- The browser is too busy executing other code
- Unoptimised JavaScript
How to fix bad First Input Delay on WordPress
- Cut down external WP Plugins
- Optimise JavaScript into fragments and only load what is needed for each page
3. What is Largest Contetful Paint (LCP)
Largest Contentful Paint, or LCP for short, measures how long it takes for the largest element on your webpage to load. It measures how long it takes for your website to be fully loaded by looking at the largest and presumably the last file to load in lamens.
Causes of Poor Largest Contentful Paint
- Assets are not correctly optimised
- Images are too large
- Lack of src-set being used
- Website doesn’t use lazy loading for images
How to fix bad Largest Contentful Paint on WordPress
- Follow the guide above to minify and compress your static assets
- Serve optimised webp images
- Use WordPress responsive images
- Install lazy loading on your website
WordPress Basics Optimisation
Everything in this section will cover the basics. These are things I do first with every single wp installation I develop or optimise. I don’t see these as optional steps.
If you have not used WordPress before, you should check out my post covering essential WordPress plugins which covers a huge variety of helpful wp plugins.
1. Change WordPress Permalinks
Changing WordPress permalinks by following these steps will ensure all of your URLs are correctly formatted for search engines.
These actions will remove any dates or categories in the URL and make them nice and short, so your URLs can be easily read in search results.
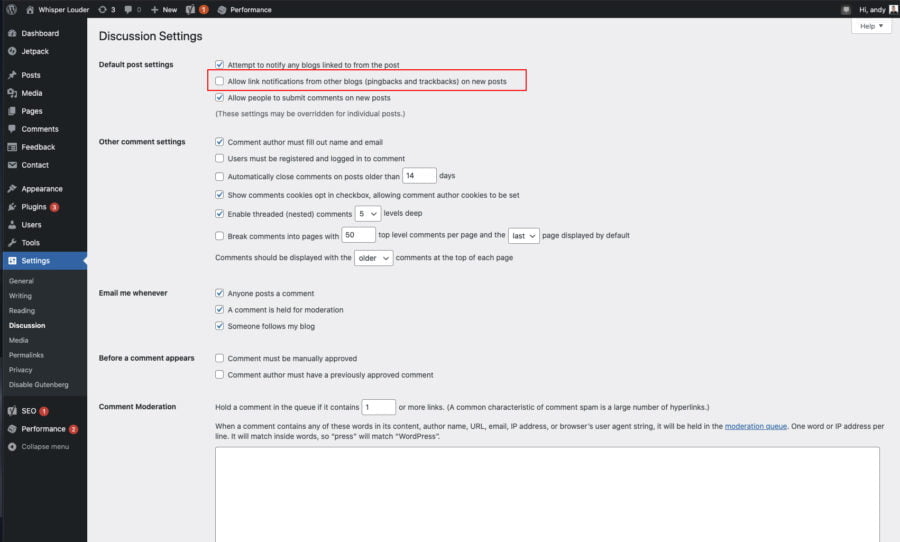
How to change WordPress Permalinks to Post name only
- Visit your WordPress Admin Dashboard
- Goto
wp-admin > settings > permalinks - Under Common Settings, select Post Name
- Hit Save
If you have an established website already indexed, it would be risky to perform this step as you would need to set up redirections for every post on your website.
2. Disable trackbacks and pingbacks
Spammers mainly use WordPress trackbacks and pingbacks. I have only found them useful only a handful of times, which is why I disable them on every WordPress site I optimise.
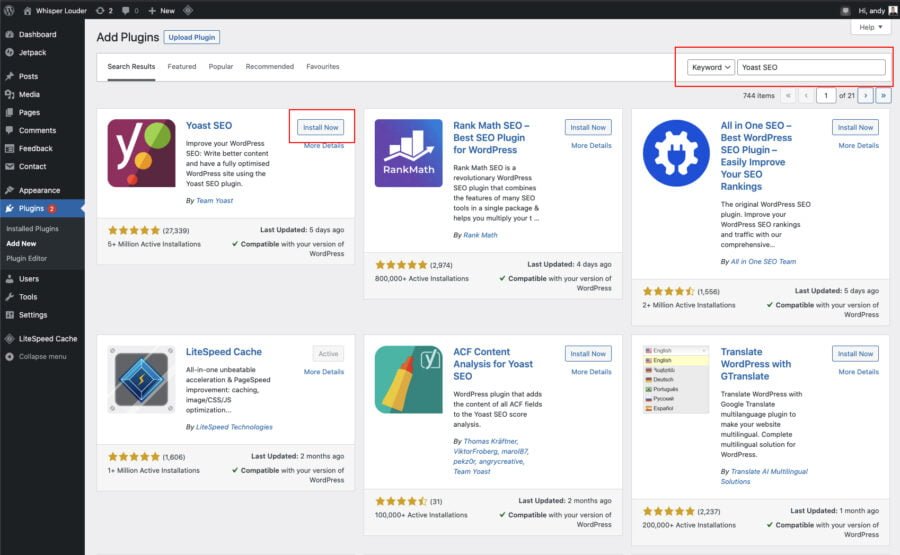
How to disable trackbacks and pingbacks in WordPress
- Visit your WordPress Admin Dashboard
- Goto
wp-admin > settings > discussion - Uncheck Allow link notifications from other blogs (pingbacks and trackbacks) on new posts
- Hit Save
You don’t have to disable trackbacks and pingbacks but, as your site grows, so will your comment spam. It’s better to handle pesky spammers now!
3. Change Website Meta Title & Meta Description
Out of the box, your website meta title and meta description will be set to a generic WordPress output used on default installations and won’t tell search engines anything about who you are.
How to change the Default Site Title on WordPress

- Visit your WordPress Admin Dashboard
- Goto
wp-admin > settings > general - Change
Site Title - Change
Tagline - Activate the plugin
The site title (meta title) should ideally be set to your Brand name whereas the tagline (meta description) should be set to a short description that is keyword rich.
These fields will primarily be assigned to your home page and used as a basis by Yoast SEO in further steps that we will configure.
4. Clean WP Head
As I mentioned at the start of the article, WP provides an extensive feature set out of the box, but it can be a little bloated. The whole point of this guide is to make WordPress run faster the perfect place it start is cleaning up WP Head.
4a. Remove WP Version Number
WordPress, by default, outputs its version number. While it won’t impact the website’s speed, it gives away key information to hackers that can easily identify a vulnerable installation.
remove_action ('wp_head', 'rsd_link');
4b. Remove Query Strings from Static Resources
function wl_remove_query_strings( $src ){

 	$parts = explode( '?', $src );

 	return $parts[0];

}

add_filter( 'script_loader_src', 'wl_remove_query_strings', 15, 1 );

add_filter( 'style_loader_src', 'wl_remove_query_strings', 15, 1 );
4c. Disable XML-RPC RSD link from WordPress Header
remove_action ('wp_head', 'rsd_link');
4d. Remove wlwmanifest link
remove_action( 'wp_head', 'wlwmanifest_link');
4e. Remove Shortlink Reference
remove_action( 'wp_head', 'wp_shortlink_wp_head');
WordPress SEO Optimisation Guide
Let’s kick things off and make sure our technical on-site SEO is perfect with a section about WordPress SEO Optimisation and how you can take care of it yourself.
For this section, we will be using Yoast SEO for WordPress, a free plugin found on the WordPress repository.
1.Install Yoast SEO
Optimising onsite WordPress SEO might seem a little daunting, but this amazing plugin will handle everything for us, provided we give it a little tickle with some configuration.
Don’t worry, though. I will guide you through the steps to set up Yoast SEO perfectly and explain everything along the way.
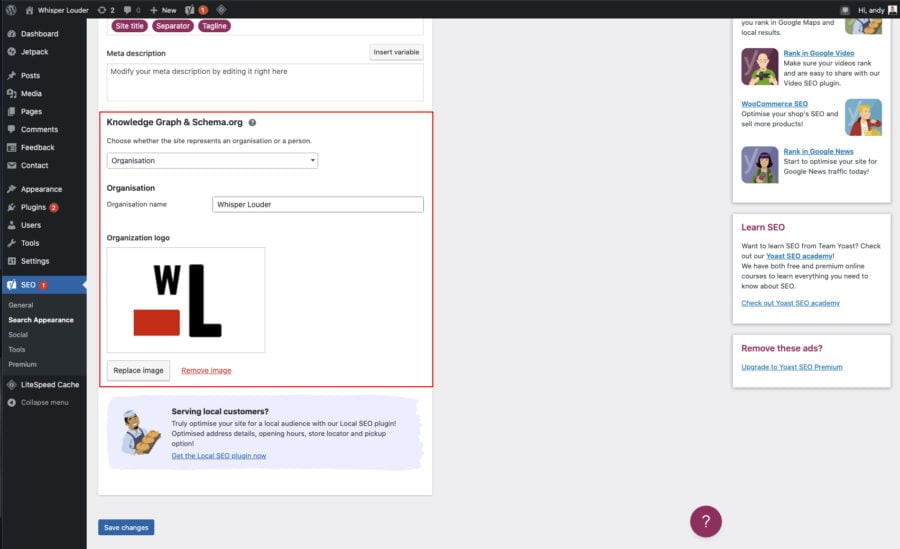
How to Install Yoast SEO in WordPress
- Visit your WordPress Admin Dashboard
- Goto
wp-admin > plugins > add new - Search for
Yoast SEO - Click Install
- Activate the plugin
2. Schema.org Business Information Setup
Integrating schema markup in your WordPress site will help search engines better understand your business, who you are and the type of website you are running. It’s an important step you definitely shouldn’t be missing out on.
How to setup Yoast business information schema
- Visit your WordPress Admin Dashboard
- Goto
wp-admin > SEO > search appearance - Scroll down to the section:
Knowledge Graph & Schema.org - Select if you are a person or organisation
- Fill out your company name
- Upload your company logo
3. Social Media Setup
So Yoast can let search engines know about your different Social Media accounts and show that they belong to your business. You need to configure Yoast, so it knows what they are.
How to change social media accounts in Yoast SEO
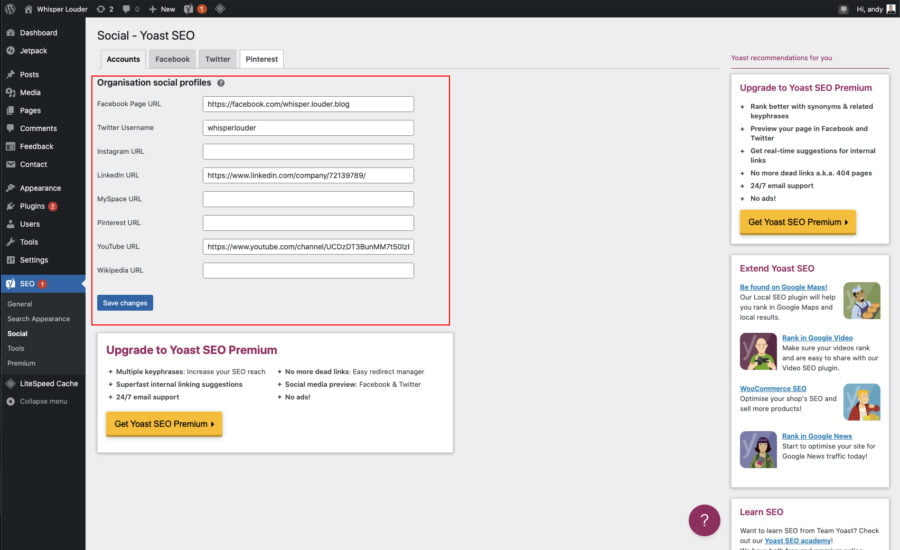
- Visit your WordPress Admin Dashboard
- Goto
wp-admin > SEO > social - Fill out each of the fields
4. Yoast Breadcrumb integration
Yoast breadcrumbs come optimised for the user and search out of the box and provide a smooth user experience for your readers. I use it on this blog. Maybe you saw it at the top of this page?
Before you can integrate Yoast with your WordPress theme, you need to make sure that it is enabled.
How to enable Yoast SEO Breadcrumbs in WordPress
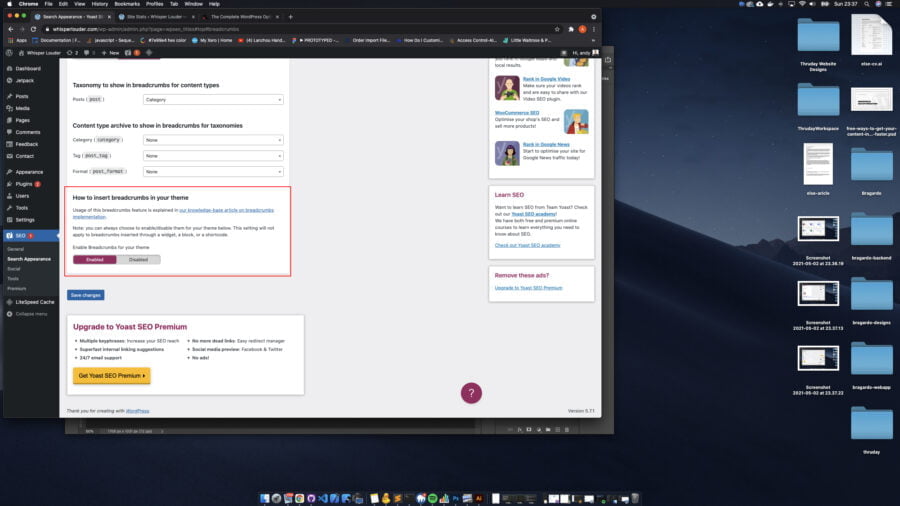
- Visit your WordPress Admin Dashboard
- Goto
wp-admin > Search apperance > Breadcrumbs - Scroll down, click enable
How to integrate Yoast SEO Breadcrumbs
You have two options to integrate Yoast SEO Breadcrumbs within your WordPress website. The first, which is really easy, use a shortcode.
[wpseo_breadcrumb]
This can be great for people with no coding knowledge, but it can become tedious to insert it on every page you use.
The second way involves editing your template files via FTP. It would take me an entire article to show you how to integrate Yoast SEO breadcrumbs with your theme, so instead, I will leave it down to Yoast to show you how to get it done.
You can find the full guide here.
4. Setup Search Appearance
This is a step I’ve seen most people skip when they set up Yoast SEO themselves, don’t! I mean, you can If you want, but it will cause some headaches down the line with page titles being too long, amongst other issues.
The best Yoast SEO search appearance settings

- Visit your WordPress Admin Dashboard
- Goto
wp-admin > Search apperance - Under General, Set the Home Page SEO Title to
%%sitename%% %%sep%% %%sitedesc%% - Under Content Types, Set the Posts SEO Title to
%%title%% - Under Content Types, Set the Pages SEO Title to
%%title%% %%sep%% %%sitename%% - Under Taxonomies, Open the tags dropdown and set Show Tags in search results? to off
- Under Taxonomies, Under categories, set the SEO Title to
%%term_title%% %%sep%% %%sitename%% - Under Archives, set Date archives to disabled
These are my go-to yoast search appearance settings on a clean WordPress installation. It’s a good mix between branded pages and clean post titles. It works well and avoids any errors being reported in SEO software, and does great to avoid duplicate content.
WordPress Speed Optimisation
WordPress speed optimisation is not as hard as you might think. Ok, it can be quite a time-intensive task but, once it’s done, it’s done, and you can enjoy a blazing-fast WordPress blog.
88% of website users admitted they were less likely to return to a website after a bad user-experience.
That’s a shocking statistic if you think about it. For every 100,000 visitors, potentially, 88,000 won’t return to you. That’s a lot of lost revenue you are missing out on.
In this section, we are going to optimise the speed of WordPress.
1. Install Database Cache for WordPress
Memcache or Redis both work as database and object caches and work in tandem with W3 Total Cache to provide a fast-access memory store. Their primary goal is to help speed up database transactions by caching small bits of information easily retrieved without placing a heavy load on the server.
Load on the server is the key point here. Memcache or Redis, an object cache – will help your website serve more concurrent connections.
How to Install Memcache on Ubuntu
Installing Memcache has many different possibilities depending on your current server setup. For example, you might not be running Apache. Instead, it might be an Openlitespeed server or NGINX.
Rather than cramming every scenario into a short space, I will link out to a quality guide that will show you exactly what you need to do for this step. Click the link here, complete the steps and come back
How to Install Redis on Ubuntu
As mentioned above, I will link you to an article that covers how to install Redis.
2. Install a WordPress Caching Plugin
You must install a WordPress caching plugin to get the most out of your installation and interact with the memory cache. Without the correct measures in place, your website will be a slow unoptimised mess.
W3 Total Cache
W3 Total Cache is one of the best WordPress optimisation plugins. It provides a robust feature-set as well as fine-grain control over the optimisation of my WordPress blogs. What I love about W3 Total Cache is the ability to split my assets up over several theme locations using their unique template tags. This allows me to optimise the delivery of assets better and avoid any JavaScript errors.
If you don’t have the technical expertise to set up a custom server configuration for Open Litespeed, then W3 Total Cache would be my go-to and what we will be using for the remainder of our speed optimisation section.
How to Install a W3 Cache for WordPress
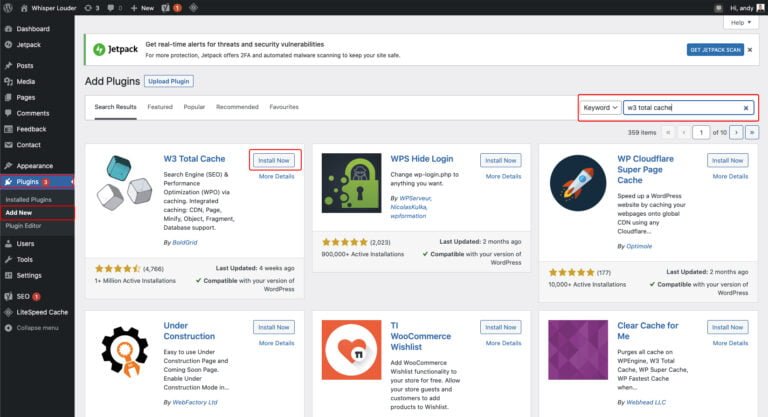
- Visit your WordPress Admin Dashboard
- Goto
wp-admin > plugins > add new - Search for
W3 Total Cache - Click Install
- Activate the plugin
3. Edit Theme Files & Insert W3 Template Tags
This step is optional and can be skipped if you don’t have the confidence to edit template files yourself; however, I would highly recommend this step is completed.
Not every website is easy to optimise. Sometimes combining assets and minifying them can cause things to break. By having these tags placed in strategic places through your WordPress theme files, we can better optimise asset delivery and avoid any issues with scripts breaking.
How to install W3 asset output tags
- Connect to your server or use the WordPress theme editor
- At the root of your theme, open
header.php - At the root of your theme, open
Footer.php - In the same
footer.phpfile,
4. Minify & Combine CSS
To reduce the number of connection to your server and optimise the delivery of your website stylesheets, we need to combine all of the cascading style sheets (CSS) and minify the combined file to reduce its overall size.
Luckily for us, W3 Total Cache comes complete with all of the functionality we need. With the tags you installed in the previous step, it’s going to make it really easy to get everything optimised the way it should be.
How to Automatically Minify CSS with W3 Total Cache
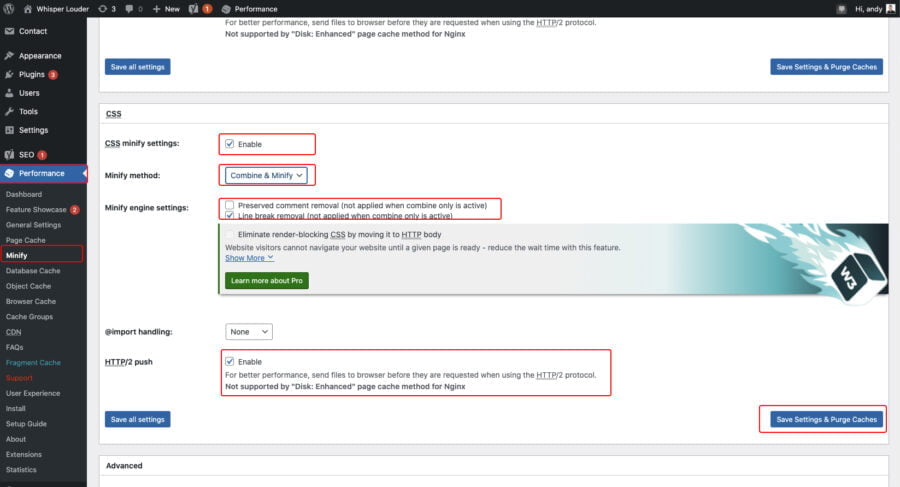
- Visit your WordPress Admin Dashboard
- Goto
wp-admin > performance > minify - Under CSS, Make sure to enable CSS Minify Settings
- Under Minify Method, Select Combine & Minify
- Under HTTP2 Push, Make sure its Enabled
- Click, Save Settings & Purge Caches
5. Minify & Combine JavaScript
As with combining and minifying the CSS on your website, we need to do the same with JavaScript (JS). We will reduce the number of requests made to the server by combining all of the JS files into one, and then we will compress the output by minifying the result.
How to Automatically Minify JavaScript with W3 Total Cache
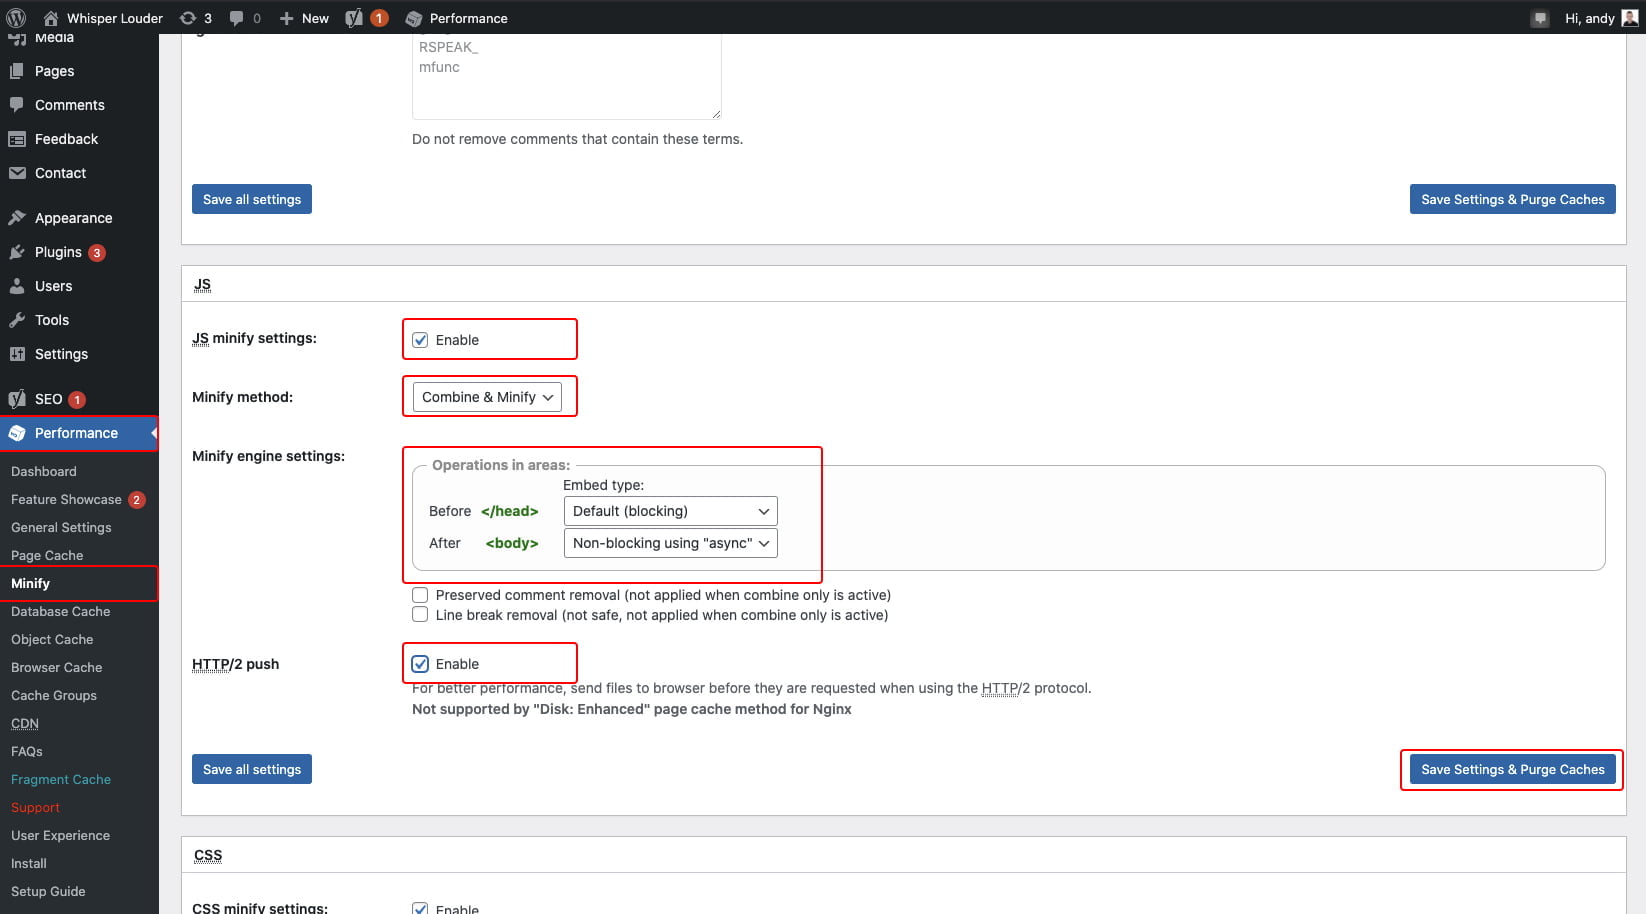
- Visit your WordPress Admin Dashboard
- Goto
wp-admin > performance > minify - Under JavaScript, Make sure to enable JavaScript Minify Settings
- Under Minify Method, Select Combine & Minify
- Under Minify Engine, set Before head to Default Blocking
- Under Minify Engine, set
to Non-blocking using ASYNC - Under HTTP2 Push, Make sure its Enabled
- Click, Save Settings & Purge Caches
6. Minify HTML
Pagespeed insights recommend minifying all assets. That does include minifying your HTML as well. It’s a simple step to complete and comes with very few risks associated. The only caveat I can think of is;
If your HTML code is broken, such as missing tags, it is possible that minifying the HTML could break your website.
How to Automatically Minify HTML with W3 Total Cache
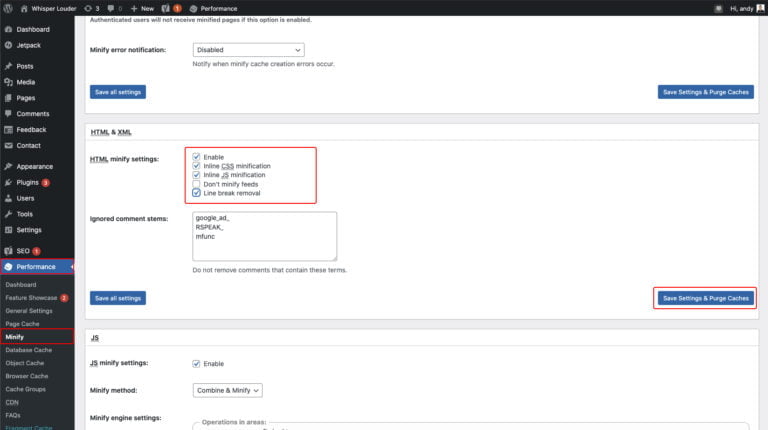
- Visit your WordPress Admin Dashboard
- Goto
wp-admin > performance > minify - Go to HTML & XML > HTML minify settings
- Make sure the following are all checked: Enable, Inline CSS modification,. Inline JS modification, Line Break Removal
- Click, Save Settings & Purge Caches
7. Enable Page Cache
WordPress Page Cache will save your server! WordPress is a dynamic platform. That means that WP dynamically creates every page and post from the database. The developer provides some templates that pages must adhere to but, it’s all done dynamically on the fly.
By enabling the page cache, W3TC will create static versions of all the pages on your website. It will reduce the load on your server, allowing it to serve more concurrent connection without getting overwhelmed.
Best Page Cache Settings for W3 Total Cache
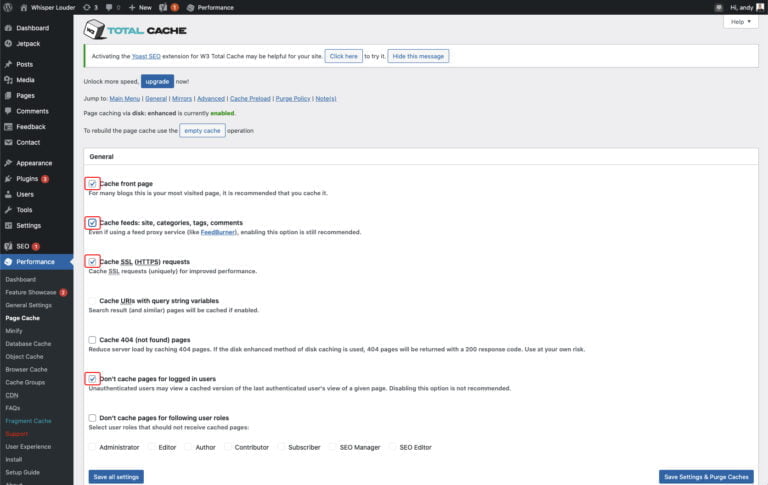
- Visit your WordPress Admin Dashboard
- Goto
wp-admin > performance > page cache - Under General, Enable Cache Front Page, Cache Feeds, Cache SSL, Don’t cache pages for logged in users
- Under Cache Preloud, Enable Automatically Prime the Page Cache, Preload the post cache upon publish events
- Click, Save Settings & Purge Caches
8. Enable Browser Cache
Browser cache works similarly to Page Cache. Still, instead of making static copies of dynamic pages, browser caching tell users computers to ‘store’ all of your assets with expiry on how long they should be stored for.
Assets include; Cascading style sheets, JavaScript, Web Fonts and Images. This can be helpful to returning users and your infrastructure. Browser cache reduces the number of requests on your servers. Also, it provides a faster user experience to your readers by loading assets from their hard disk instead of your server if they have visited your website before.
How to Enable Browser Cache with W3 Total Cache
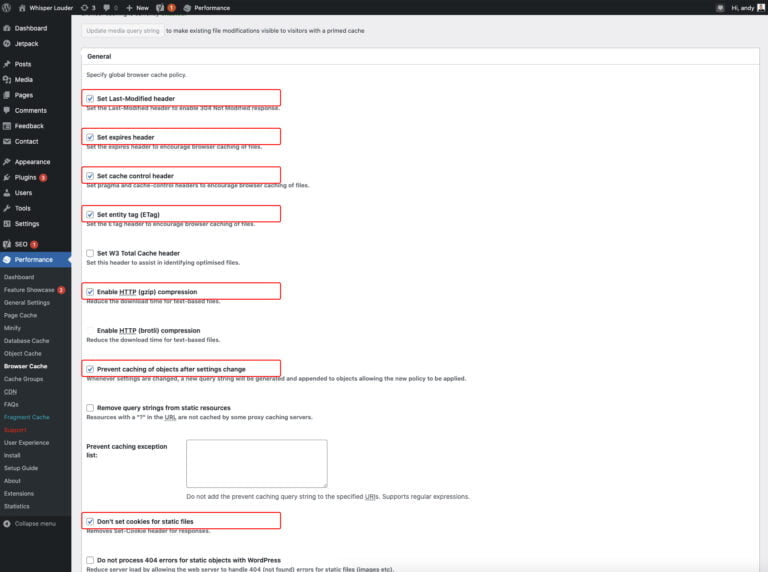
- Visit your WordPress Admin Dashboard
- Goto
wp-admin > performance > browser cache - Under General, Enable Set Last-Modified header, Set expires header, Set cache control header, Set entity tag (ETag), Enable HTTP (gzip) compression, Prevent caching of objects after settings change, Don’t set cookies for static files
- Under CSS & JS, Enable Set Last-Modified header, Set expires header, Set cache control header, Set entity tag (ETag), Enable HTTP (gzip) compression, Prevent caching of objects after settings change, Don’t set cookies for static files
- Under HTML, Enable Set Last-Modified header, Set expires header, Set cache control header, Set entity tag (ETag), Enable HTTP (gzip) compression
- Under Media & Other Files, Enable Set Last-Modified header, Set expires header, Set cache control header, Set entity tag (ETag), Enable HTTP (gzip) compression, Prevent caching of objects after settings change, Don’t set cookies for static files
- Click, Save Settings & Purge Caches
9. Enable Object & Database Cache
Object & Database cache is the reason why you installed either Redis or Memcache earlier. It will dramatically speed up your wp website with just a few clicks by caching common functions and database actions which in turn will reduce the load on your server, therefore increasing its throughput.
How to enable object cache WordPress
- Visit your WordPress Admin Dashboard
- Goto
wp-admin > performance > general settings - Under Database Cache, Make sure its enabled and set it to either Redis or Memcache depending on which you installed earlier
- Under Object Cache, Make sure its enabled and set it to either Redis or Memcache depending on which you installed earlier
- Click, Save Settings & Purge Caches
Congratulations, you made it through the gauntlet! I hope you learned something, and your website is now blazing fast. If you’re are stuck or having problems, leave me a comment, and I shall do my best to help.
In conclusion, If you liked this article, it would really help if you shared this with your friends.